Showing posts with label How To. Show all posts

Thursday, April 11, 2013

Tiered Make Up Stand

I've been seeing all these cute little tiered stands on Pinterest. Like this little cutie from BHG. And then I realized the Dollar Store could be the perfect place to find what I'm looking for. So I walked around the Dollar Tree for approximately a million hours looking at all my options for trays and while I love their metal serving platters, I wanted the proportions of a small platter on top of a larger platter. I finally settled on some burner covers to get the proportions. I went to the craft store with a plan but as all my projects seem to go, the execution altered from my plan.

Supplies: Burner covers, super glue, candlestick, spray paint, and washi tape.
The original plan was to spray paint the tops and bottoms of the covers and maybe add some washi tape to the edge. That is not quite how it went.

After doing a test on the back of the trays, I didn't like the paint. I wasn't sure if it was the brand or the can or operator error but it spattered everywhere while I was spraying and created big splotches. It was a mess. And that little spot on the little cover? I sprayed that and the paint literally repelled off so that was it for the paint. I got the great idea that I could use the washi tape to add some flair to the edges  and leave the inside of the covers (mostly) white.

I did the little cover with pink washi tape and the big cover with purple chevron washi tape.

 I decided to clean up the inside edge too so I added the opposite color on the inside edge.

Then I just super glued the whole situation together.

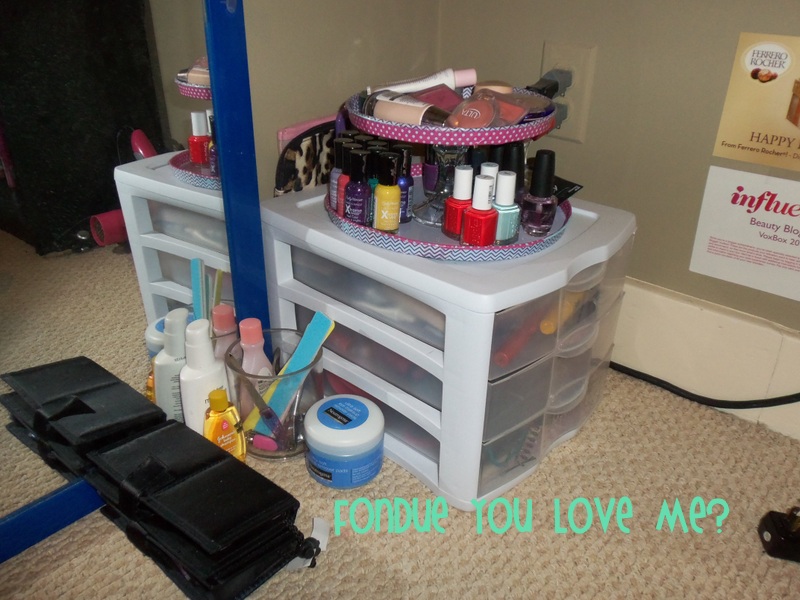
And there she is all set up with my make up. I think after all this, I'm going to remake it some day. But for now it works and its cute. Plus it gives me a place to display my nail polish.

Tuesday, April 9, 2013

Fabric Covered Cork Boards

I have a problem. I love pictures so much that if I'm not careful, they will take over my room. I just love seeing the things that make me happy every day. And for the last 18 months, that has been my nephew. So obviously, I need pictures of him from every age all over my walls at all times. Well not all over. My OCD does apply to my walls so one wall is AST stuff, one wall is for my family and friends, and one has art I picked out from the arts & crafts festival in East Lansing. But anyways, the wall over my desk felt like it was missing something and I acquired some small square cork boards when we cleaned out the chapter room.  I didn't like the brown color so I decided to cover them with some leftover fabric from my stash. This project cost me NOTHING! Yay! So here's how they came together...

Seriously. Just cork boards, fabric, scissors, and a stapler. You might want some push pins to hold the fabric in place while you're folding and stapling it into place.

See my little push pins? So helpful when you're making sure the pattern stays the where you want it. Also, ironing it first and then adding creases as you go might help. That just sounded like a lot of work and I didn't want to drag my iron out.

Add some ribbons to the back if you like that look. I attached them with a little fabric glue and a couple of staples. I just wanted to make sure they wouldn't fall off my wall.

Aww they're cute! The green and black fabric is leftover from Grace and my failed attempt to make letters when she first joined. I really like that I get to look at it everyday and be reminded of those memories.The other fabric is just something I accumulated when my big graduated.

Now I realize the black frame isn't straight. I straightened it out before I took the picture but I'm pretty sure it hates me because it does that every time I straighten it. Also I just noticed one of the pics I put on my new cork board is also framed so I'll print something new to put up there. Oh well.

What do you think?! So cute right? Do you have any projects that you made from just stuff you had? It's the best when something like this comes together with no extra investments.

Thursday, April 4, 2013

How To Clean Your Stove Top

Boys are kinda gross. Well, my house isn't much cleaner than a boy's but that's because I live with two girls who act like boys. So anyways, I was helping Joe clean his kitchen and this is what his stove looked like when I started.


Can you say ew? Yeah. Don't ask me what that brown goo in the middle is but it was very hard and scrubbing was getting me know where. I remembered that white vinegar is used for cleaning a lot so I poured some of that on and then I was like what the hell, I've seen pinterest posts use baking soda so I poured some of that on. Which was really fun by the way. And I let that sit for a few minutes. It didn't clean everything but it did make it easier to get most of it up. I have other plans to try other products because I'm determined to make it look like boys never touched it. It left the caked on stuff that is right around the burner but it got all the big stuff up. See?


The actual grey burners need to be cleaned and as you can see on the front left burner, there is still some caked on stuff but I have plans of attack with some harsher chemicals so I'll let you know how that goes!

Tuesday, February 5, 2013

DIY Tank Top

My biggest boy pet peeve? Muscle shirts. And women wearing a boy's muscle shirt with a sports bra. But I get the appeal. It's cooler and easier to move in. But I don't want to wear a shirt that looks like it belongs to a boy. And tank tops made for women are usually too tight. When we went to Cedar Point last summer, I made one of these tank tops and I absolutely love it. I used one of Joe's that was stained and he was going to throw away anyways.
  1. Cut off the arms and neck. Cut them a little deeper that just the seam.
  2. Turn the shirt over and cut a little deeper just off the back of the neck and the arms.
  3. Using part of the shirt that you cut off, pull a strip through both sleeves and tie a double knot.
If you're like me and you don't like working out in just a bra, this is a great option. There are a lot of other variations on the internet. I have two more of Joe's old shirts to work with so I might try something different with the next one. 


Monday, February 4, 2013

Sorority Paddles

It took me a long time to learn the tricks to making a cool paddle. If you're not creative, it's hard to know what you're doing. I just finished Emily's "Tacky Christmas" Themed Paddle and I thought I'd give you a couple of tips for making a great paddle.


  • Always make a plan before you start. There is nothing worse than getting started and realizing there was a way cooler way to do something.
  • When you're painting, be a perfectionist. Nothing ruins the look a paddle more than smudges and lines that aren't quite straight.
  • Details matter. Just because you're going simple doesn't mean you can't make every detail perfect. With the tacky sweater pattern, I painted a little "v" texture into the shapes so that it had that sweater look.
  • Clear coat. It really is necessary. It makes the paddle look so finished and polished.
  • If you're gonna go big, go big. Those Christmas lights light up and I searched everywhere for that mini garland.
Did you make a cool paddle? Send me a pic or a link because I'd love to see it!